
STM32F0-Discovery
ADC 4ch in DMA and SysTick
ADC 4ch in DMA and SysTick

Home
Page
STM32F0xx Page
STM32F0xx Page
This example was tested on STM32F0-Discovery and does the following
things:
This examples was tested using:
For test this program use the STM32F0-Discovery and you see the LEDs flashing at 100mS (see SysTick configuration).
For see the result of ADC conversion do this:
Now connect, for example, PA0 to a potentiometer and RUN and PAUSE again the program, you must see a value in RegularConvData[0] that depend of the position of the cursor of the potentiometer.
If you want to use this example on ATOLLIC do this:
If you want to use this example on KEIL do this:
For get this example click here and download the: STM32F0-Discovery-ADC-4ch-in-DMA-and-SysTick
Configure the GPIOs for driving the LEDs (LD3 and LD4), the flashing is control by SysTick.
Configure the ADC_ch7 (PA7), ADC_ch1 (PA1), ADC_ch2 (PA2) and ADC_ch3 (PA3) and acquire them via DMA.
The ADC results are stored in: RegularConvData_Tab[4]
see below.
Configure the ADC_ch7 (PA7), ADC_ch1 (PA1), ADC_ch2 (PA2) and ADC_ch3 (PA3) and acquire them via DMA.
The ADC results are stored in: RegularConvData_Tab[4]
see below.
ADC_ch7 (PA7) --> RegularConvData_Tab[1]
ADC_ch1 (PA1) --> RegularConvData_Tab[0]
ADC_ch2 (PA2) --> RegularConvData_Tab[3]
ADC_ch3 (PA3) --> RegularConvData_Tab[2]
ADC_ch1 (PA1) --> RegularConvData_Tab[0]
ADC_ch2 (PA2) --> RegularConvData_Tab[3]
ADC_ch3 (PA3) --> RegularConvData_Tab[2]
This examples was tested using:
STM32F0-Discovery
STM32F0 Library Ver. 1.0.0
KEIL (32KFree) ver.4.23 and ver.4.53
ATOLLIC ver.3.1.0
Windows XP and Windows 7
STM32F0 Library Ver. 1.0.0
KEIL (32KFree) ver.4.23 and ver.4.53
ATOLLIC ver.3.1.0
Windows XP and Windows 7
For test this program use the STM32F0-Discovery and you see the LEDs flashing at 100mS (see SysTick configuration).
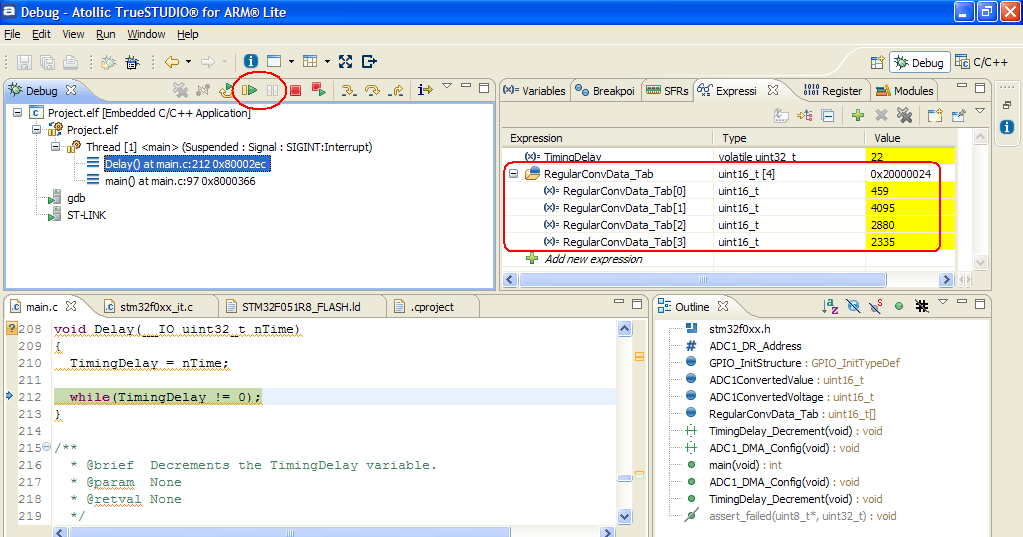
For see the result of ADC conversion do this:
Enter
in DEBUG mode and RUN the program, next pause the execution and you
must see something like below (for ATOLLIC TrueSTUDIO).
Now connect, for example, PA0 to a potentiometer and RUN and PAUSE again the program, you must see a value in RegularConvData[0] that depend of the position of the cursor of the potentiometer.
If you want to use this example on ATOLLIC do this:
Enter in the directory:
C:\.......\F0-ADC4chDMAandSysTick_Lib.v1.0.0\Project\STM32F0xx_StdPeriph_Templates\TrueSTUDIO\Project
Next double click on:
.cproject
When ATOLLIC starts, in the window that appears, chose the directory:
C:\........\F0-ADC4chDMAandSysTick_Lib.v1.0.0\Project\STM32F0xx_StdPeriph_Templates\TrueSTUDIO
and press OK
Next double click on:
.cproject
When ATOLLIC starts, in the window that appears, chose the directory:
C:\........\F0-ADC4chDMAandSysTick_Lib.v1.0.0\Project\STM32F0xx_StdPeriph_Templates\TrueSTUDIO
and press OK
If you want to use this example on KEIL do this:
Enter in the directory:
C:\.......\F0-ADC4chDMAandSysTick_Lib.v1.0.0\Project\STM32F0xx_StdPeriph_Templates\MDK-ARM
Next double click on:
Project.uvproj
Next double click on:
Project.uvproj
For get this example click here and download the: STM32F0-Discovery-ADC-4ch-in-DMA-and-SysTick