
Home Page
Compiler Tips and tricks
STM32 home page
-
How to enter in Debug mode and stop Indipendent Watchdog and Window Watchdog (STM32L)
Disable compiler optimalization and enabled feature stop watchdog when the core is stopped.
Bit 12 DBG_IWDG_STOP:Debug Independent Watchdog stopped when Core is halted
0: The independent watchdog counter clock continues even if the core is halted
1: The independent watchdog counter clock is stopped when the core is halted
Bit 11 DBG_WWDG_STOP:Debug Window Watchdog stopped when Core is halted
0: The window watchdog counter clock continues even if the core is halted
1: The window watchdog counter clock is stopped when the core is halted
-
How to enter in Debug mode during standby mode (STM32L)
This should be possible, just add a library command:
DBGMCU_Config(DBGMCU_STANDBY);
before entering standby mode.
DBGMCU_Config(DBGMCU_STANDBY);
before entering standby mode.
-
How to transfer SW project between different release of ATOLLIC - 2.1.0 => 2.3.0
Normaly you
have a old release of ATOLLIC project and normaly you need transfer it
under new ATOLLIC release; i.e. , from 2.1.0 to 2.3.0
For do this follow this tutorial.
For example we suppose that you have the example:
Things to remember when developing a program for STM32 using STM32-Library (ref.cod. STM32-Discovery-Test-for-Atollic that is here)
this example was developed under ATOLLIC ver. 2.1.0
the file name of this example is:
Lib340_IO-ADC-UART-SPI_STM32FDiscov-ATOLv210.zip
We suppose that you put the contents of Lib340_IO-ADC-UART-SPI_STM32FDiscov-ATOLv210.zip in the directory:
C:\EXEMPI-SW\STM32-Discovery-Test-for-Atollic
Inside the directory (C:\EXEMPI-SW\STM32-Discovery-Test-for-Atollic) you must have:
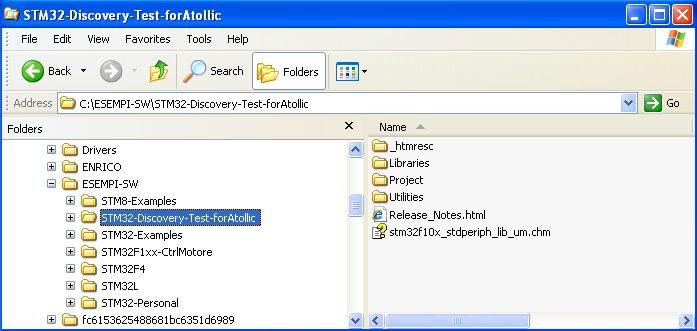
Now start ATOLLIC v.2.3.0 and when appear the Workspace Launcher you must select the directory:
C:\ESEMPI-SW\STM32-Discovery-Test-forAtollic\Project\STM32F10x_StdPeriph_Template\TrueSTUDIO
In this directory there is the original directory:
.metadata
that contains the setup for ATOLLIC.
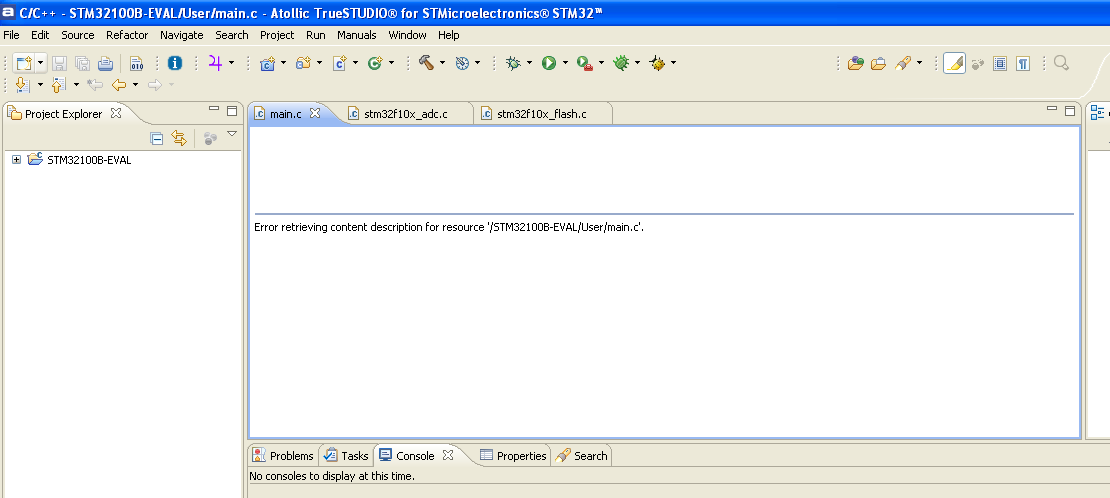
When the ATOLLIC IDE is open you must see something like below.
Now is necessary configure the path that use the ATOLLIC.
Select the project name and next chose:
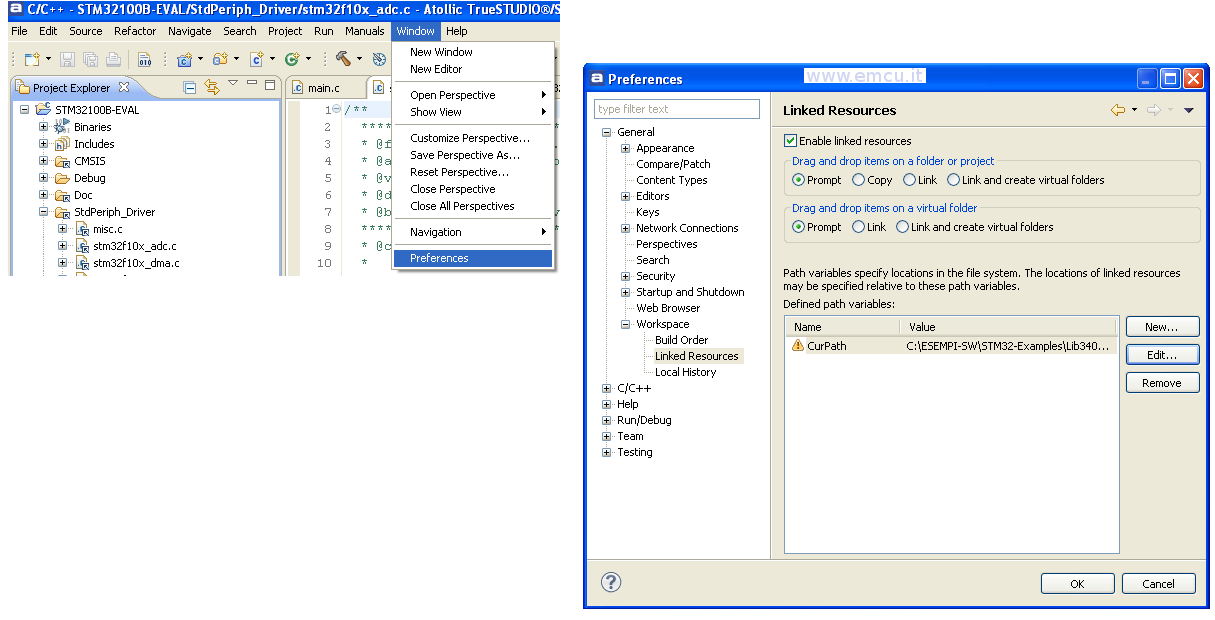
Windows -> Preference
and from the new window that appear select:
General -> Workspace -> Linked Resources
from the new window tah appear you must see:
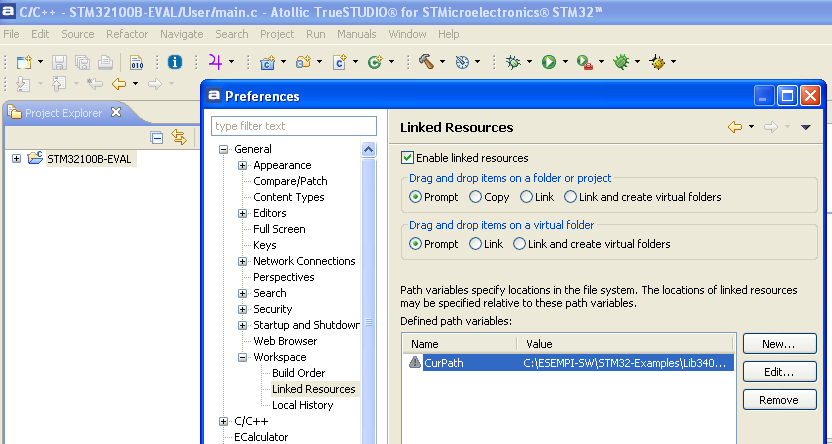
Select CurPath and press Edit.
From the new window that appear press Folder and select the directory: C:\EXEMPI-SW\STM32-Discovery-Test-for-Atollic
see below.
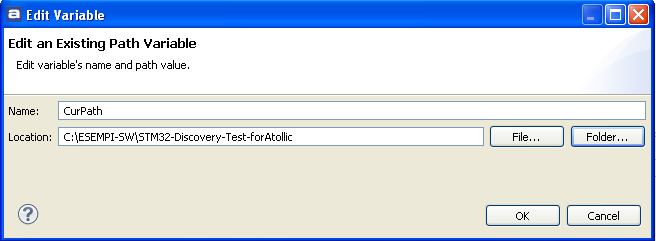
If CurPath is not present choose New and enter the same data (see upstairs).
Now try to compile the program:
Project -> Build All
Probably the AOLLIC show the error below:
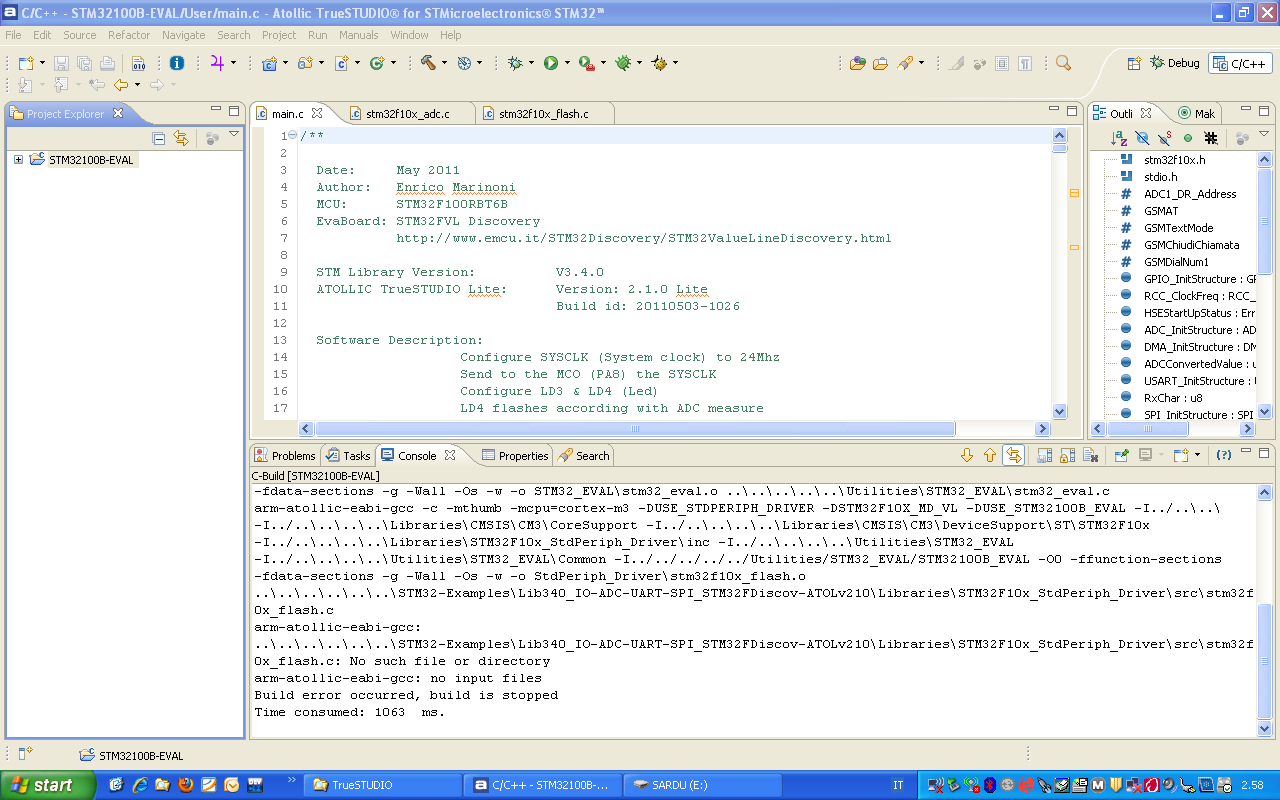
This is because some path file are not right.
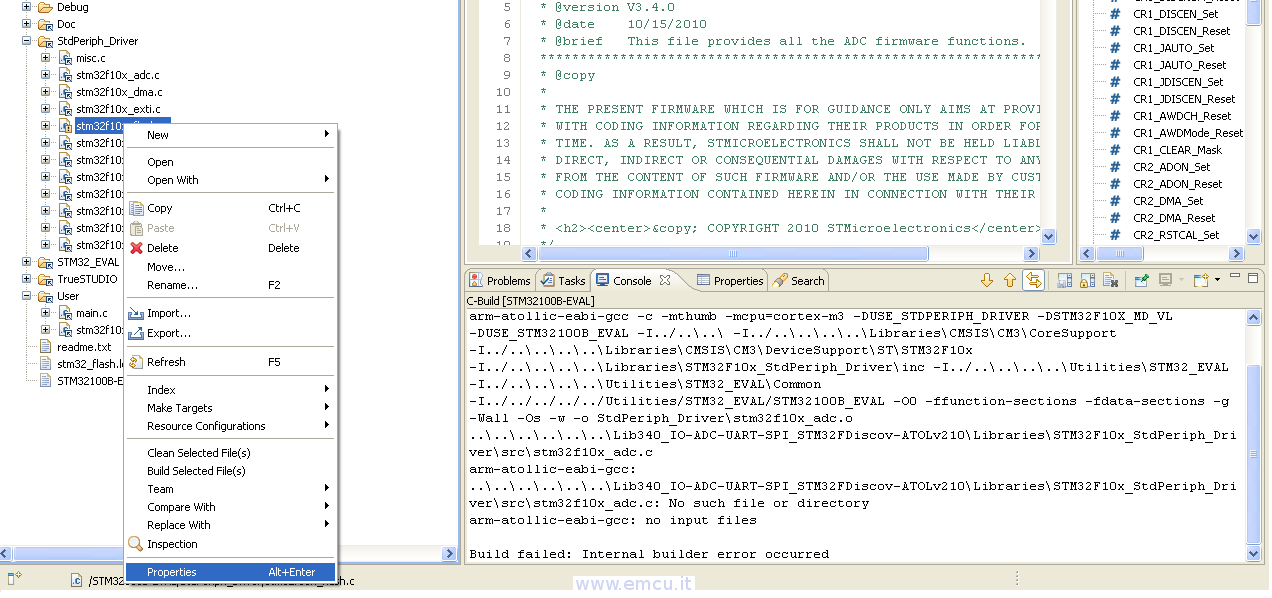
This behavior is not explained, perhaps it is a bug in any case the problem can be solved quickly by opening:
StdPeriph_Driver
You probably see some files marked with an exclamation point, see below.
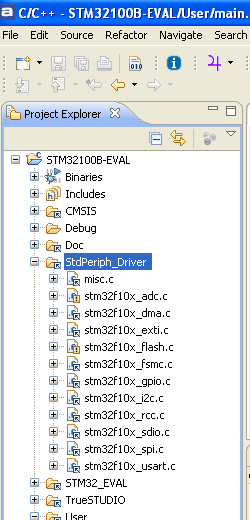
To solve this problems do this:
Click with right mouse button on the stm32d10x_adc.c
From the window that appears select: Properties
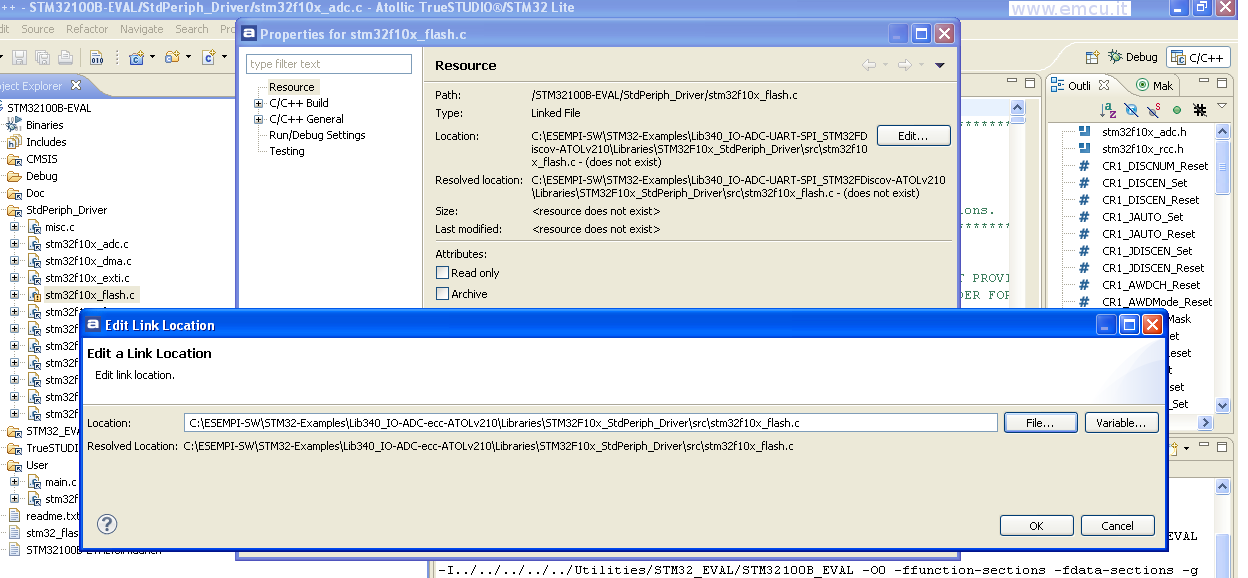
Again a new window appears and from it select: Edit
Again a new window appear and from it select File to locate the right location of stm32d10x_adc.c that is:
C:\ESEMPI-SW\STM32-Discovery-Test-forAtollic\Libraries\STM32F10x_StdPeriph_Driver\src\stm32f10x_adc.c
Now press OK to back to previous window. Now press Apply and OK.
At this point the exclamation point disappears, this means that the path is correct.
Do the same for the file: stm32d10x_flash.c
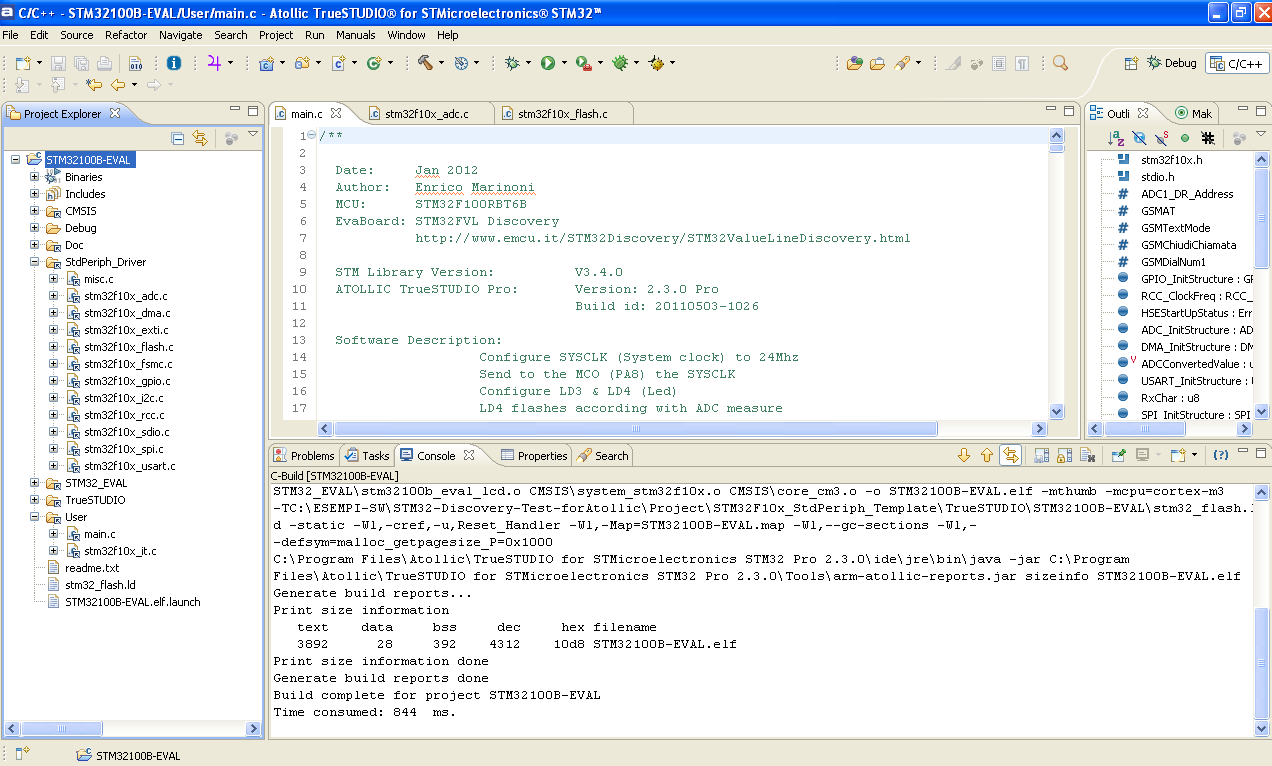
Now try to compile the program:
Project -> Build All
all now is correct and you must see something like below.
For do this follow this tutorial.
For example we suppose that you have the example:
Things to remember when developing a program for STM32 using STM32-Library (ref.cod. STM32-Discovery-Test-for-Atollic that is here)
this example was developed under ATOLLIC ver. 2.1.0
the file name of this example is:
Lib340_IO-ADC-UART-SPI_STM32FDiscov-ATOLv210.zip
We suppose that you put the contents of Lib340_IO-ADC-UART-SPI_STM32FDiscov-ATOLv210.zip in the directory:
C:\EXEMPI-SW\STM32-Discovery-Test-for-Atollic
Inside the directory (C:\EXEMPI-SW\STM32-Discovery-Test-for-Atollic) you must have:
Now start ATOLLIC v.2.3.0 and when appear the Workspace Launcher you must select the directory:
C:\ESEMPI-SW\STM32-Discovery-Test-forAtollic\Project\STM32F10x_StdPeriph_Template\TrueSTUDIO
In this directory there is the original directory:
.metadata
that contains the setup for ATOLLIC.
When the ATOLLIC IDE is open you must see something like below.
Now is necessary configure the path that use the ATOLLIC.
Select the project name and next chose:
Windows -> Preference
and from the new window that appear select:
General -> Workspace -> Linked Resources
from the new window tah appear you must see:
Select CurPath and press Edit.
From the new window that appear press Folder and select the directory: C:\EXEMPI-SW\STM32-Discovery-Test-for-Atollic
see below.
If CurPath is not present choose New and enter the same data (see upstairs).
Now try to compile the program:
Project -> Build All
Probably the AOLLIC show the error below:
This is because some path file are not right.
This behavior is not explained, perhaps it is a bug in any case the problem can be solved quickly by opening:
StdPeriph_Driver
You probably see some files marked with an exclamation point, see below.
To solve this problems do this:
Click with right mouse button on the stm32d10x_adc.c
From the window that appears select: Properties
Again a new window appears and from it select: Edit
Again a new window appear and from it select File to locate the right location of stm32d10x_adc.c that is:
C:\ESEMPI-SW\STM32-Discovery-Test-forAtollic\Libraries\STM32F10x_StdPeriph_Driver\src\stm32f10x_adc.c
Now press OK to back to previous window. Now press Apply and OK.
At this point the exclamation point disappears, this means that the path is correct.
Do the same for the file: stm32d10x_flash.c
Now try to compile the program:
Project -> Build All
all now is correct and you must see something like below.
-
How to manage the project path
Normaly if you receive the
ATOLLIC (ver.2.1.0) example from a friend the path inside the IDE are
the original path of the installation of your friend and consequently
the MAKE is impossible.
To SetUp the general PATH of your project (the working directory) do this:
To SetUp the general PATH of your project (the working directory) do this:
1) Select WINDOWS -> PREFERENCES
2) From the windows that appears select: GENERAL -> WORKSPACE -> LINKER RESOURCES and edit the CurPath.
2) From the windows that appears select: GENERAL -> WORKSPACE -> LINKER RESOURCES and edit the CurPath.
For
example if you have the project in the directory: c:\pippo
you must select c:\pippo
you must select c:\pippo
Sometimes, for a bugs inside the ATOLLIC, some path of files inside the StdPeriph_Driver are not changed.
For resolve this problem do this:
1) Right click on the file (that have a problem) and select PROPERTIES.
3) From the new window that appear select: FILE and select the right location of the file.
For resolve this problem do this:
1) Right click on the file (that have a problem) and select PROPERTIES.
In the example below the file is: stm32f10x_flash.c
2) From the window that appear select: RESOURCE and press EDIT3) From the new window that appear select: FILE and select the right location of the file.
See below.
-
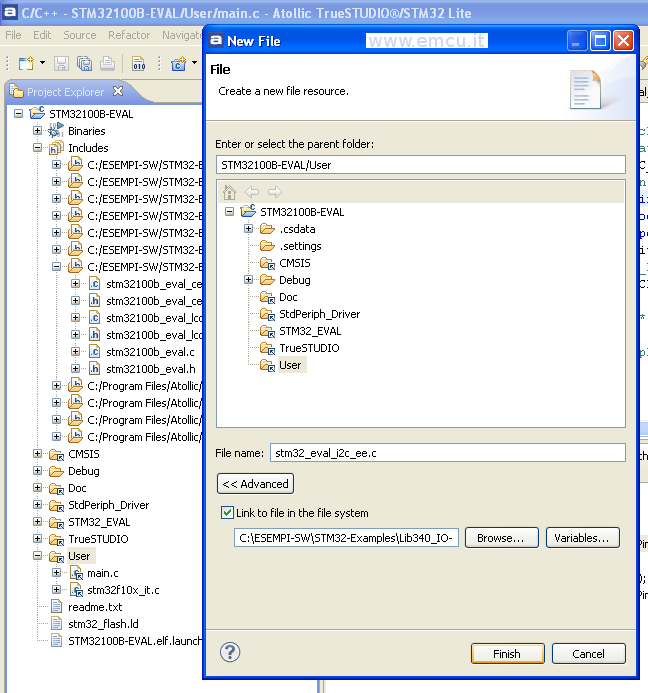
Add file to the project
If you need add file to your project follow the explanation below.
Select the folder in where you need insert the file and click on it with the right mouse button.
From the window that appears select NEW -> FILE
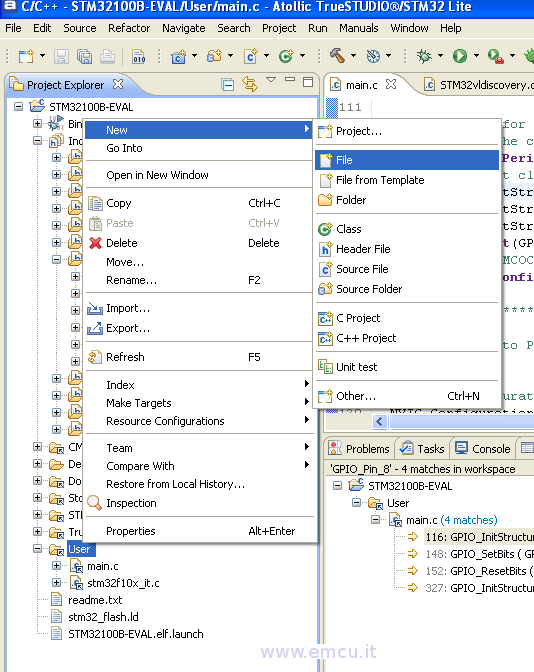
From the new window that appears select ADVANCED and press on BROWSE button for select the file that you need insert in your project.
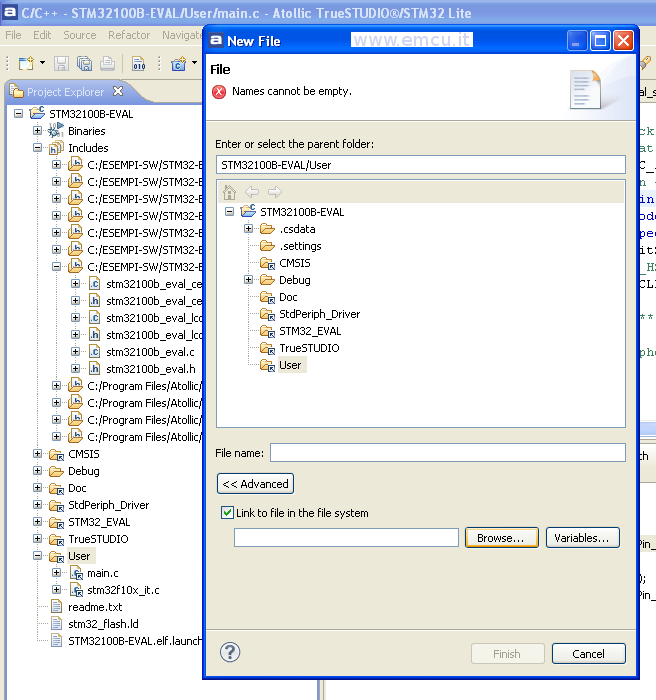
Now press on FINISH button.
Select the folder in where you need insert the file and click on it with the right mouse button.
From the window that appears select NEW -> FILE
From the new window that appears select ADVANCED and press on BROWSE button for select the file that you need insert in your project.
Now press on FINISH button.