
Home
Page
STM32L
STM32
For start to develop a new project on STM32Lxxx are necessary:
-
C Compiler
-
STM32L-Library
KEIL
-
GPIO example ready to use
STM32L
STM32
For start to develop a new project on STM32Lxxx are necessary:
- C Compiler, see here
- STM32L-Library, see here
- Remember to clock the
peripherals before use (
system_stm32l1xx.c)
- For start to develop a new project is a good idea to use the STM example
- KEIL tools
- Emulator, for example ST-LINK-v2, see here
- Optionally, STM32L-Discovery for quick start
- Go here to get this example ready to use
-
C Compiler
For choose a C Compiler see here.
-
STM32L-Library
Now is available the CUBE, please use it.
The below link are for who started a project before the release of CUBE.
The below link are for who started a project before the release of CUBE.
STSW-STM32077 - STM32L1xx standard peripherals library
STSW-STM32002 - Clock configuration tool for STM32L1xx microcontrollers
STSW-STM32081 - STM32F10x and STM32L1xx USB full-speed device library
Extra SW are available here and here
STSW-STM32002 - Clock configuration tool for STM32L1xx microcontrollers
STSW-STM32081 - STM32F10x and STM32L1xx USB full-speed device library
Extra SW are available here and here
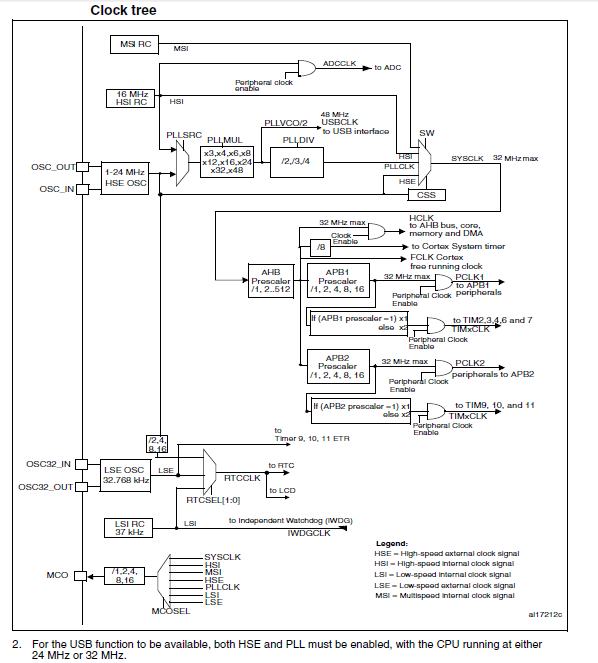
Remember that at power-on all peripherals are OFF
so before configure it turn ON the clock on the peripherals that you
need to use.
Below there is the Clock-Tree
Below there is the Clock-Tree
Remember
to select the proper clock source, see CUBE.
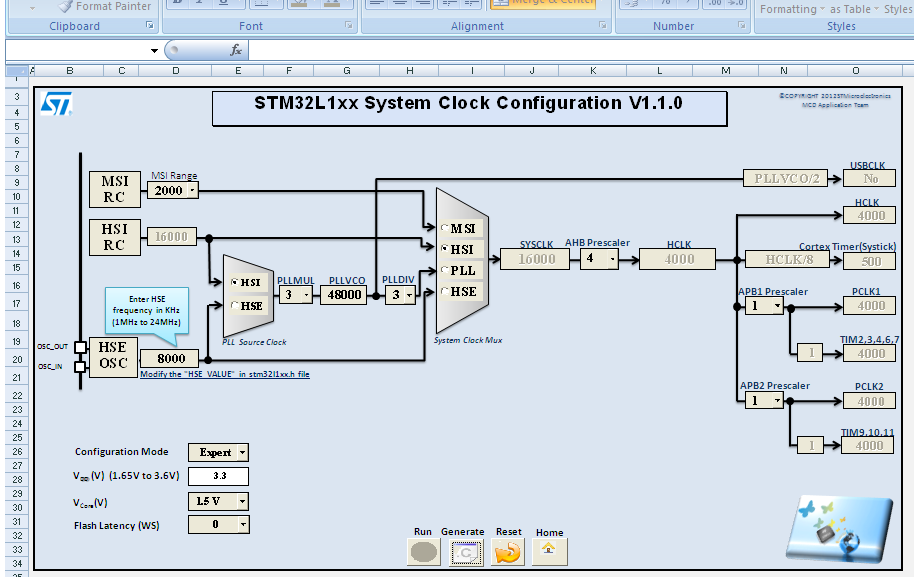
For who don't use CUBE the clock configuration is in the file:
For who don't use CUBE the clock configuration is in the file:
system_stm32l1xx.c
Fortunately STM has released an excel file that help us to configure the clock tree.
Fortunately STM has released an excel file that help us to configure the clock tree.
The excel output is:
system_stm32l1xx.c
that contain the setup for the clocks tree.For start to develop a new project is a good idea to use the CUBE or STM examples.
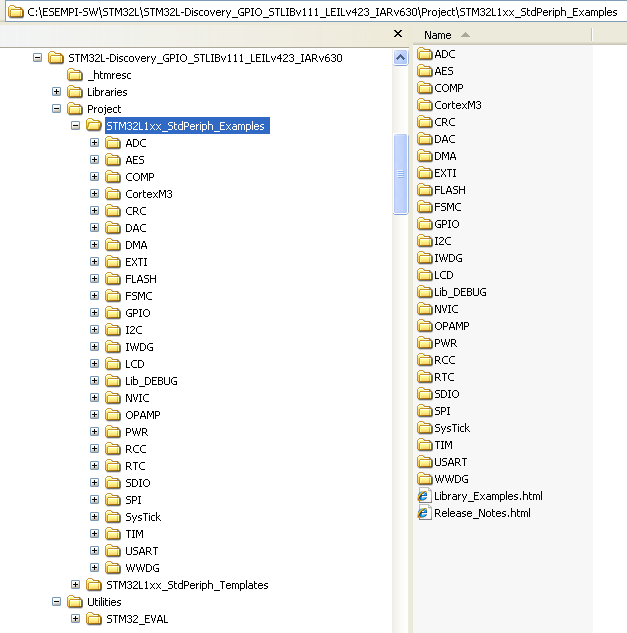
First, create a new project directory, for example: MyFirstProject
Second, copy inside the MyFirstProject all the file of STM32L-Library (below is STM32L1xxx_StdPeriph_Lib_V1.1.1)
See below.
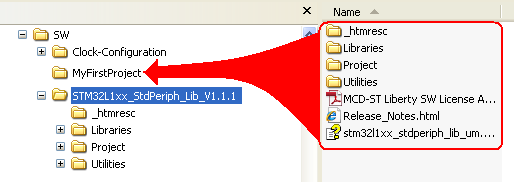
The STM examples are in the directory:
C:\...\Project\STM32L1xx_StdPeriph_Examples
See below.
First, create a new project directory, for example: MyFirstProject
Second, copy inside the MyFirstProject all the file of STM32L-Library (below is STM32L1xxx_StdPeriph_Lib_V1.1.1)
See below.
The STM examples are in the directory:
C:\...\Project\STM32L1xx_StdPeriph_Examples
See below.
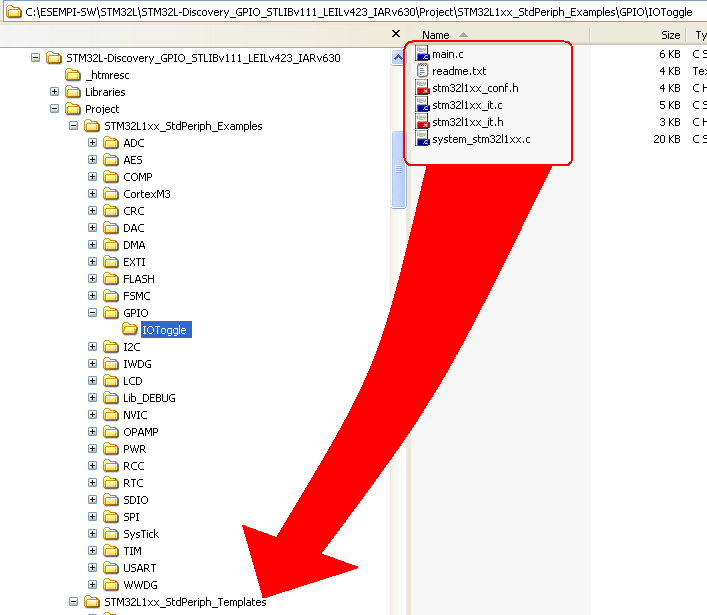
The use of STM Library examples is
very easy, it is necessary only to do a copy and paste.
Suppose that you need to test the GPIO-IOToggle example that is in the directory:
Suppose that you need to test the GPIO-IOToggle example that is in the directory:
C:\...\Project\STM32L1xx_StdPeriph_Examples\GPIO\IOToggle
You must select all the
file that are in the IOToggle directory and copy there to the directory:C:\...\Project\STM32L1xx_StdPeriph_Templates
See below.Now the way for open the project depend of the tool that you use.
Choose the tools below for continue this tutorial:
Choose the tools below for continue this tutorial:
KEIL
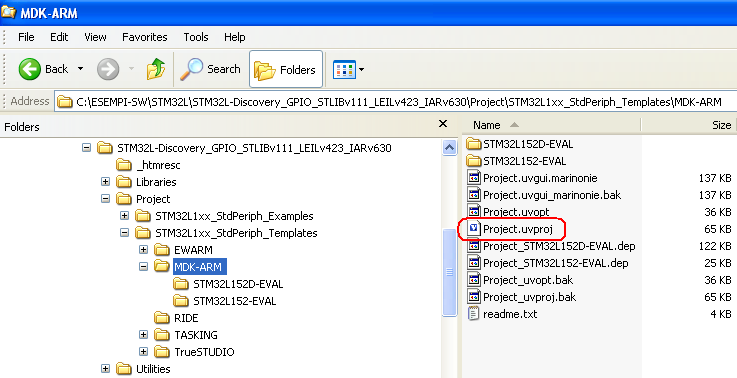
Now, we suppose that you use KEIL, simply enter in MDK-ARM directory and double click
on the file:
Project.uvproj
and KEIL is open automatically.
See below.
Project.uvproj
and KEIL is open automatically.
See below.
Before to compile the project you must:
Configure the I/O, referring your board, in our case we use the STM32L-Discovery and the I/O are configured in this mode:
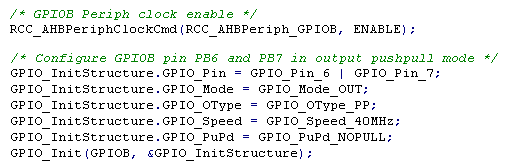
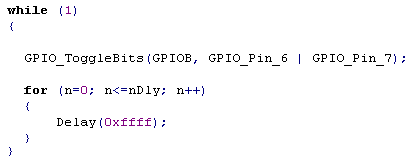
We decide also to modify the while loop, see below.
Configure the I/O, referring your board, in our case we use the STM32L-Discovery and the I/O are configured in this mode:
We decide also to modify the while loop, see below.
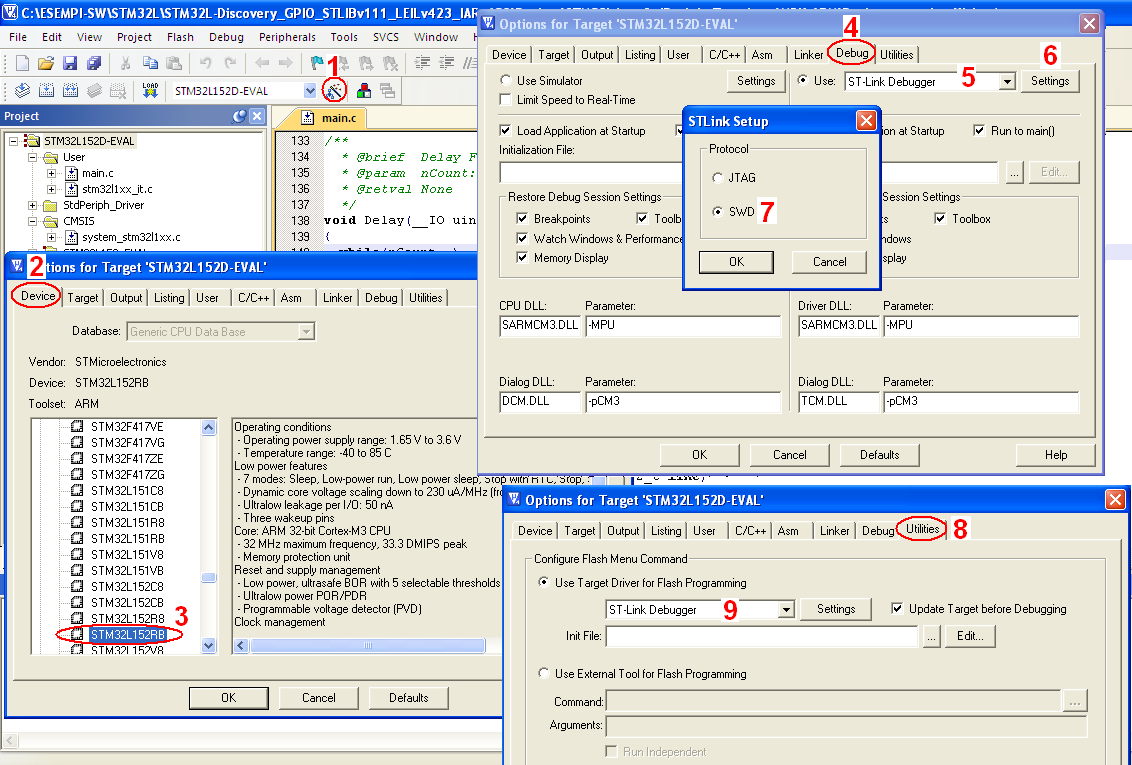
Now is necessary configure the MCU
that you use and the Debugger (or Emulator) that you use.
- Select Teget Option (1) -> Device (2) -> and select your MCU, in our case is STM32L152RB because we use STM32L-Discovery (3)
- Next select Debug (4) -> select ST-Link Debugger (this because we use STM32L-Discovery)(5) -> select Settings (6) and in the new window that appear select SWD (7)
- Next select Utilities (8) and select again ST-Link Debugger (9)
See below.
Now you are ready to compile and
debug your project.
At the end of compilation KEIL show you the code size of the project.
ZI-Data: is the Zero Initialized Data
RO-Data: is the Constants.
Total RAM Size = RW-Data + ZI-Data
Total ROM Size = Code + RO-Data + RW-Data
Some constants (RO-Data) are generated by the compiler/linker and might also be from libraries.
-
GPIO example ready to use
If you need this example ready to use
go here.